

The start of December marks a significant moment in the winter calendar. It waves the green flag for Christmas celebrations, calendar counting, and excessive decoration of our homes. Of course, these conditions result in only one thing – the most wonderful time of the year.
I will admit, I am an overt fan of Christmas. I find myself blasting Bublé in mid-November every year. This year, however, my favourite festivities have been somewhat shadowed by the looming cloud of living costs.
I have felt plagued by the pressure of gift-giving and Secret Santas when I can barely afford to heat my home – and I’m sure this feeling is mutual. Some say time is money, but by process of elimination, I have realised that my own time and labour is the only thing I can really afford. Because it’s free.
Thus, as Christmas approaches, I’ve been researching how to use my limited creative ability to craft some wholesome gifts. Obviously, my main source has been the search bar on TikTok. After mindlessly scrolling, I discovered Last Ember are hosting candle-making workshops at Hatch. Who doesn’t love a scented candle?
The workshops are priced at £39.50 – a perfectly reasonable price point for the experience, but not within the piteous margins of my student finances. Broke and inspired, I decided to DIY some candles at home instead. Here’s how it went.
I will confess at the preliminary stages I carried out minimal research. I had naively decided that candle making was straightforward and I would figure it out as I went along. I was mistaken. Luckily, this article documents any dos and don’ts.
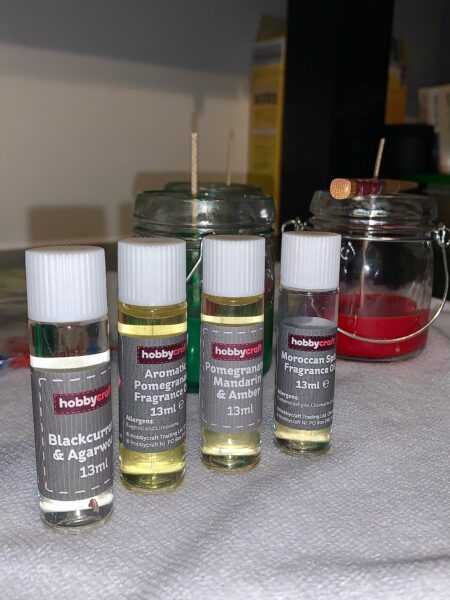
Essentially, there are five main ingredients in a scented candle. You need wax, a wick, scented oil, coloured dye, and moulds. Good news – they’re all very affordable.
If, like me, you’re impulsive and feel the need to start a project at a moment’s notice, you can head to your nearest craft shop and nab them all in one go.
I went to HobbyCraft and bought 1kg of paraffin container wax (£10); 12 pre-waxed wicks (£3.50); a 4-pack of scents (£10); some assorted dyes (3 for £5.50); and some cute jars from the baking section (3 for £3). For those of you with rusty mental maths, the total came to £32.
You may be thinking – hang on, that’s almost the same price as the candle-making workshops at Hatch. You’d be correct. However, at the workshop, you can make two candles. By making them at home, you can make between six to eight candles (depending on size).
I split the cost of each material with my housemate, and we made six candles. This left me with three candles, individually priced at £5.30. Notably, there are many places you can purchase a scented candle for less – but where’s the fun in that?
Undoubtedly, the homemade element of these (affordable) candles is what makes them such a thoughtful and wholesome gift. If you enjoy crafting, the endless design choices, colour combinations, and scent variations make the creative process extremely satisfying.
Step one was very plain-sailing. All we had to do was secure our wick in the centre of our moulds. Admittedly, we had some old superglue lying around – if you don’t, you may want to budget this in.
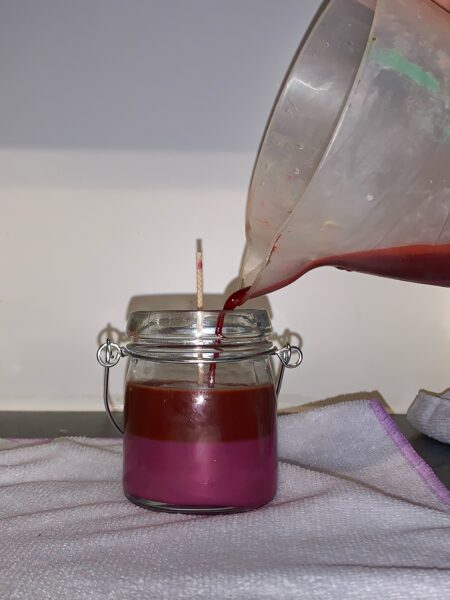
If you want to make a variation of designs, you’ll need to sketch out a colour plan for each candle. Bare in mind that as you layer each section of coloured wax, you’ll need to leave it to cool before attempting the next layer.
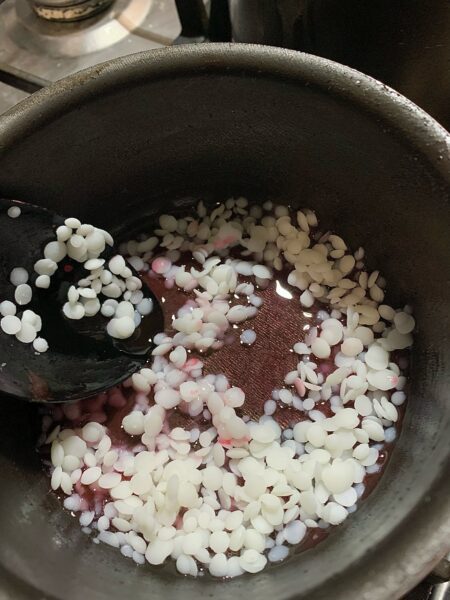
To make each layer in our candles, we melted some clear wax in a saucepan – which notably melted a lot faster than anticipated. We then added our dye at varying levels of intensity. For example, I wanted one of my candles to consist of three layers, each sporting a different variation of purple.
I started with a deep wine red, poured a layer, and then experimented with drops of blue and pink to create a spectrum throughout the subsequent layers of wax. One of the few smart decisions we did make during this process was to test our colours out on bits of card before pouring to see what they’d look like dry.
For the most part, this was a fun success – but as time went on, we became trigger-happy. My housemate ended up with what can only be described as dirt-coloured wax for his final candle. Top tip – a little dye goes a long way!
Throughout the evening, we had about three saucepans on the go at once. We paid our respects to the colour wheel by ensuring that our yellows, oranges, and reds were housed in a separate saucepan to our pinks, purples, and blues.
After we’d mastered wax colouring, the process became simple. We worked on rotation: hot wax, dye, layer, cool, repeat. To scent a layer, we measured out 1 cap (around 2ml) of scented oil per 100g of wax pellets and mixed them into the pan.
Again, as time went on, we became overly confident and ditched the scales. I would be lying if I said I knew exactly which measurements went into each creation. That’s another don’t. Learn from my mistakes, and be more meticulous with your Christmas candles.
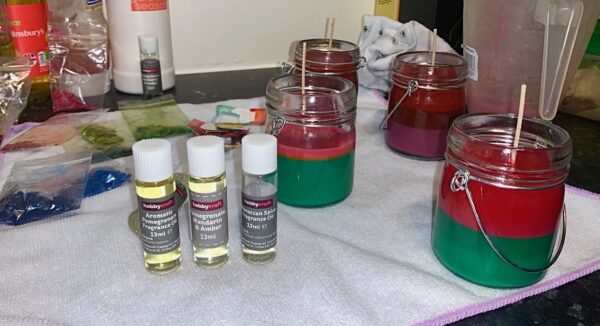
All in all, the DIY candle-making workshop was a success. My friend and I created six personalised gifts for our friends and family, and the house smelt wonderful after burning all those scented oils.
The whole process took around three hours – with breaks throughout to let the candles cool (and watch The Crown). It was a really nice way to spend an evening with friends, especially since it was too cold and drizzly to go out for a pint.
If you’re considering trying this at home, I hope this article guides you in the right direction. Be sure to keep an eye on any hot wax on the hob, and keep it on a low heat. Also, don’t wash your equipment directly in the sink afterwards. No one wants a drain clogged with solidified wax this Christmas!
We used warm water, soap, and paper towels to clean our pans in a plastic washing-up bowl. Admittedly, our methods for disposing of the resulting waxy water weren’t the most efficient. We ended up pouring it into an unwanted garden pot. On reflection, I would suggest that better methods exist.
If you’ve read this article and thought ‘what a hassle’, you can still sign up to Last Ember’s workshops. Either way, whether you’re DIY-ing it at home, or getting crafty at Hatch with a glass of prosecco, there is no doubt you’ll enjoy this wholesome way of gift-giving this year.


